
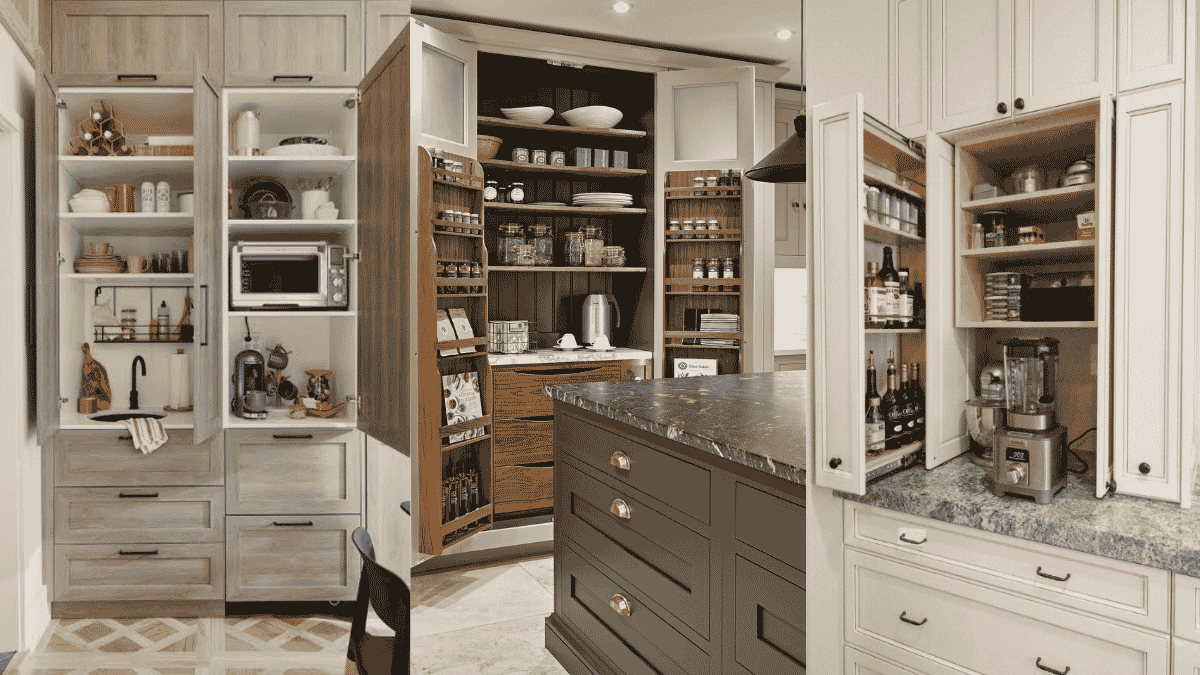
Most kitchens look great until you start living in them. You spend good money on nice stone counters. Then three weeks later, you cannot see the stone anymore. A coffee machine takes one corner. An air fryer hogs the other corner. Loose black cords tangle around the toaster.
You end up chopping onions on a tiny sliver of counter space. A modern appliance garage cabinet provides the ultimate countertop clutter solution for crowded counters. It gives you smart vertical appliance storage right on your counter behind doors that close.
A good kitchen appliance cabinet keeps your everyday gear plugged in and ready to use. When you finish breakfast, you shut the doors and your kitchen looks spotless again. But building one that actually works takes some thought.
Homeowners search for appliance garage cabinet ideas and kitchen appliance garage ideas to build a kitchen garage. You must wire outlets safely, pick space-saving doors, and keep steam from ruining your wood. Here is how to plan one that works in real life.
The Real Numbers for Heights Depths and Counter Clearances
Most people mess up their first cabinet because they guess the measurements. They build a box that looks fine on paper, but their blender hits the top shelf. You have to measure your actual machines with your own hands before ordering anything.
Standard bottom counters are twenty-four inches deep. Your countertop sitting unit usually takes up twelve to fifteen inches against the back wall. That leaves you about nine to twelve inches of perimeter counter space out front. That front ledge is where you butter toast, pour coffee, and set down hot pans.
Exact Heights for Daily Countertop Machines
A KitchenAid stand mixer storage bay needs seventeen inches of clear height. Storing one in a drawer base cabinet requires a heavy-duty mixer lift mechanism. Tilt-head mixers need twenty-two inches of clear height. That lets the motor tilt back without hitting the shelf.
Without that extra height, you must drag the heavy mixer out into the room every single time. A high speed blender nook needs eighteen inches of room so your kitchen island workstation stays open. A four slice toaster nook needs fourteen inches so rising heat does not scorch the wood above it. An electric kettle station needs top clearance so the lid flips open without hitting the shelf above.
Leave room for food processor storage, a microwave cabinet insert, and proper countertop depth clearance. Leave two inches of breathing room on the sides of every single machine. That extra space makes grabbing handles easy and keeps your knuckles from scraping painted cabinet walls.
Picking Doors That Do Not Block Your Kitchen Walkways
The door style you choose makes or breaks this whole setup. If the doors stick out into your kitchen, you will leave them open all the time. Pick your door hardware based on how much walking room you have in front of the counter.
Pocket Doors That Slide Completely Out of the Way
Retractable pocket doors are the best choice. Open the doors and slide them into hidden slots inside the cabinet sides.
They never stick out into the room while you are making breakfast. That makes them ideal for a dedicated coffee station, breakfast bar cabinet, or busy espresso machine station. The only catch is that the side pocket hardware eats up four inches of your inside shelf width.
Roll Up Tambour Doors for Tight Work Areas
A tambour roll up door works just like a roll-top desk or a roll-up garage door. Narrow wood or metal slats slide up a recessed track system and coil up inside the cabinet top.
These doors take up zero counter space. You can leave dishes or cutting boards right in front. The door still rolls open smoothly. Modern metal slats look sharp and run quiet, unlike cheap plastic slats from years ago.
Lift Up and Accordion Style Doors
A lift up cabinet door uses an overhead flip up hinge to lift the front panel toward the ceiling. It gives you full view of your tools with zero side obstruction. Check your ceiling height first so the rising door clears low crown molding.
If you have a narrow kitchen walkway, bifold cabinet doors work great. They fold in half sideways and hug the cabinet front. Both setups use sliding cabinet hardware and soft close hinges so doors do not slam shut.
Simple Swinging Doors on Budget Builds
Swinging doors with a flush inset cabinet face look clean and cost less than pocket slides. They match your surrounding kitchen perimeter cabinetry with zero hassle.
The downside is simple. They swing outward over your counter. You have to move coffee cups and cereal boxes out of the way before you can open them. They work best in a corner or inside a butler pantry walk in setup.
Putting Dead Kitchen Corners to Actual Work
Every kitchen has that awkward dark corner where upper cabinets meet at ninety degrees. Nothing fits back there, and stuff gets lost behind the microwave. A corner appliance garage cabinet turns that awkward dead corner cabinet space into useful storage.
The front of a corner appliance garage cuts straight across the angle. Because kitchen corners are naturally deep, they easily swallow a bulky air fryer countertop space or a big bread machine.
Try putting this corner setup next to a pull out pantry cabinet or tall kitchen cabinets pantry. That keeps all your food, coffee beans, and appliances in one convenient breakfast corner. It saves you steps and keeps your main kitchen work triangle open for real cooking.
Electrical Wiring Rules and Why You Need a Safety Switch
An appliance box without power is useless. If you have to drag cords across the counter to find an outlet, you defeated the whole point. You need power built right into the cabinet framing from day one.
Get a Dedicated Twenty Amp Line
Do not run these machines on an old shared lighting circuit. Small heating appliances pull massive power. Running an espresso maker and toaster together draws eighteen hundred watts and can trip your breaker.
Have an electrician run a dedicated twenty amp circuit with twelve-gauge copper wire straight to this spot. Mount internal electrical outlets on the back wall, four to six inches above the stone. That keeps your plugs high and dry if milk or water spills on the counter.
You can also mount a built in power strip under the bottom shelf. Routing wires through an appliance cord grommet provides appliance cord management that prevents tangled cables in door tracks.
The Automatic Cutoff Switch You Cannot Skip
Putting a toaster inside a wooden cabinet introduces a real fire risk. If someone leaves a machine running and shuts the door, heat builds up fast inside that enclosed space.
Install an automatic master safety shutoff switch on the door frame. When the cabinet doors are open, the outlets have full power. The second you shut the doors, a mechanical contact switch cuts the power dead. If an appliance is accidentally left on, closing the door kills the power instantly.
Dealing With Hot Steam So Your Wood Cabinets Do Not Warp
Electric kettles, rice cookers, and toaster ovens throw off clouds of hot wet steam. Trapping hot moisture inside wood softens glue lines, bubbles paint, and twists cabinet doors out of shape.
Put Steaming Machines on Pull Out Trays
Good steam damage prevention comes down to moving the steam out into the room. Never boil water while your kettle sits inside the cabinet.
Mount your kettle and toaster on a heavy duty pull out tray or sliding shelf platform. When you want hot tea, slide the tray forward past the cabinet face frame. Steam rises into the open room where your range hood fan can pull it away.
Once the machine cools down, slide the shelf back inside and close the doors. Lining back walls with a heat safe interior lining, like stainless steel sheet, protects the wood. A countertop appliance heat shield under hot tools protects your stone from heat damage.
Easy Air Gaps and Cleaning Habits
Cut a small steam ventilation gap at the top back edge of the cabinet so warm air vents out naturally. Finish the interior with a moisture resistant cabinet finish to keep bare plywood from soaking up damp air.
Keeping the cabinet clean takes twenty seconds. Give the walls a quick grease residue wipe down with a damp rag once a week. Do regular crumb tray cleaning so bread bits do not pile up near heating elements.
Powder rooms with a pedestal sink need airflow to stop rot. Your appliance cabinet needs the same care.
Deciding Between Custom Woodwork and Pre Built Kits
You can build an appliance garage on any budget. Hire a custom cabinetmaker or build it yourself.
Going the Custom Millwork Route
A custom millwork design with a solid hardwood face frame gives you exact control over every inch. You get matching wood grain, custom stain, and integrated cabinet interior lighting that turns on when doors open.
A builder can hide the entire setup inside a tall pantry cabinet. That gives you a hidden six-foot breakfast wall that blends into your kitchen. Good kitchen renovation planning saves money. Check our guide on kitchen remodeling for layout and budget advice.
Smart Ways to Hack Stock Cabinets
If custom cabinetry costs too much, you can modify store-bought cabinets yourself. Several cabinet brands sell prefabricated appliance boxes designed to sit right on twenty-four-inch counters.
You can buy a standard thirty-inch wall cabinet, trim the bottom rail, and screw it to your counter. Add tambour door tracks or bifold hardware to finish it off. It gives you custom utility without the crazy price tag.
In workshops, folks use a garage storage cabinet, metal cabinets for garage gear, or garage storage lockers. Our guide on bar cabinet ideas shows how hidden shelves keep glassware organized.
Installing garage wall cabinets and cabinet garage cabinets follows that same logic. Keeping tools behind closed doors leaves your workbench clear and ready for real work.
Common Questions Homeowners Ask About Appliance Garages
Can I actually run an air fryer inside the cabinet
No, you should never cook with an air fryer while it sits inside the cabinet. Air fryers blow hot greasy exhaust out of their back vents. Put the air fryer on a slide-out tray and pull it out into the room before turning it on.
What is the most practical door style for everyday use
Pocket doors and tambour roll-up doors work best for daily use. Pocket doors slide away so you can leave them open all morning. Tambour doors roll straight up, so you never have to clear counter items out of the way.
How deep should the cabinet be to fit real appliances
Make the cabinet at least twelve to fifteen inches deep inside. That fits coffee makers and toasters comfortably while leaving nine to twelve inches of clear prep counter out front.
Will an appliance garage eat up too much counter space
It takes up the rear counter space that you rarely use anyway. In return, it clears four bulky appliances, leaving your front prep counters clean and usable.
[…] upfront, yet they last for years without warping or staining. Keep extra trays stacked inside an appliance garage cabinet so lids and removable walls stay […]