
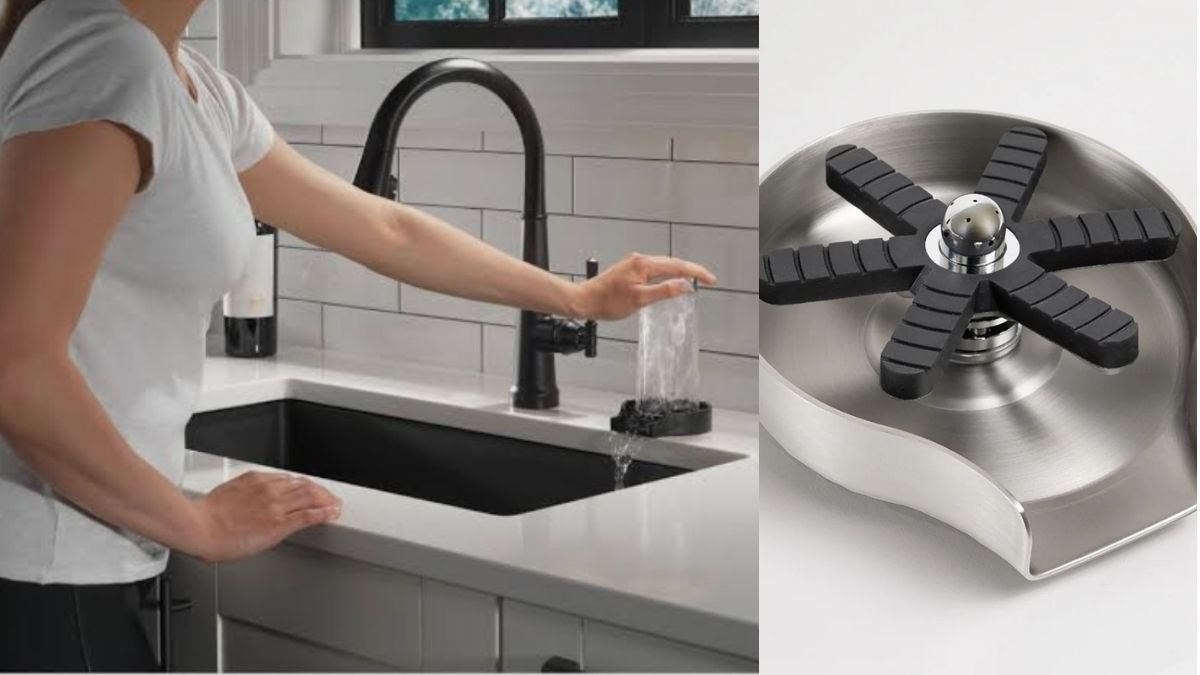
Commercial bar equipment looks sleek and effortless on social media feeds. Someone presses a glass onto a metal star. A burst of high-pressure water clears every drop of foam instantly. It feels like the ultimate kitchen gadget.
That satisfaction convinces thousands of homeowners to buy an under-sink kit. On paper, it sounds like an easy twenty-minute weekend swap. You pull out an old plastic soap pump, drop in a shiny metal tray, and hook up a braided hose.
The daily reality of owning one is messy if you do not plan ahead. If your mounting hole sits too close to your wall tiles, wide travel mugs will not fit. Connecting it to a cold water pipe leaves greasy milk residue stuck to the glass. If the tray sits dead level on your stone, dirty rinse water collects in stagnant puddles instead of draining away.
Here is the practical truth about living with a glass rinser. We cover what breaks first and how to install it.
The Three Annoying Problems People Run Into After Installation
Most product reviews only show the first day of use. Once you live with a rinser through a busy week of cooking and dishwashing, three specific flaws show up fast.
Understanding these headaches beforehand helps you avoid ruined countertops and wasted weekends.
Water Pooling Around the Base Flange
The biggest complaint from real owners is dirty water sitting in the tray. A flat tray relies on gravity to shed water into your sink basin.
If your countertop installer leveled your stone perfectly, surface tension holds water droplets inside the rinser tray. That trapped water sits under the rubber spray star, breeding pink serratia bacteria and crusty hard water scale. You must install the unit with a slight forward tilt so every drop slides over the sink lip. Adding a thin rubber shim under the back rim forces water toward the drain every single time.
Wide Travel Tumblers Hitting the Tile Wall
Soap dispensers only need an inch and a half of clearance behind the hole. That makes homeowners assume any countertop hole will work for a sprayer.
A wide cocktail shaker or forty-ounce insulated tumbler needs plenty of room to sit centered over the nozzle. A hole drilled too close to the wall creates problems. Wide cups will slam straight into your backsplash tile. The cup tilts sideways, sprays water out across your counter, and fails to clean the bottom. Always measure your wall gap before unboxing the hardware.
Stacking Cheap Plastic Splitters Under the Cabinet
Most budget kits include a cheap plastic T-splitter to tap into your existing shutoff valve. If your kitchen already has a dishwasher line and a refrigerator water line, your under-sink space is crowded.
Stacking plastic adapters on top of each other creates dangerous leverage against the copper pipe. One bump from a heavy cleaning caddy under the sink can snap a plastic thread and flood your cabinet. Buy a solid brass compression tee with metal threads. Solid brass handles household water pressure without leaking or cracking over time.
Why Cold Water Connections Fail on Real Kitchen Messes
Every kit tells you to hook into the nearest water line. People often pick the cold pipe because it sits nearby. However, that is a mistake for real dishwashing.
The temperature of the water dictates whether your cups get clean or stay greasy.
Cold Water Smears Milk and Protein Scum
If you drink smoothies or wash baby bottles, cold water does not work. Cold water causes butterfat, milk solids, and protein powder to congeal against the glass walls.
High-pressure cold water simply blasts a hole through the center of the gunk while leaving a cloudy film behind. Hot water melts dairy grease and dissolves sticky sugar syrups in three seconds. Connecting to your hot angle stop turns the sprayer into a true high-efficiency cleaning tool.
The Problem of Long Pipe Runs
There is an annoying physical limitation with hot water setups. If your hot water tank sits far away in the basement, the pipe under your sink holds cold water.
A quick three-second blast will not draw hot water all the way from the heater. You end up with lukewarm water unless you ran your main kitchen faucet hot a minute prior. If your home has an under-sink recirculating pump, hot water hits the nozzle instantly. Without a pump, running the faucet for five seconds primes the line with steaming water.
How This Setup Fits into Daily Baby Care and Entertaining
Knowing who actually uses this hardware helps you decide if it is worth losing a countertop hole. Some households run it twenty times a day, while others forget it exists.
The device shines when handling narrow containers that standard dish sponges cannot reach.
Fast Cleaning for Bottles and Sippy Cups
Parents dealing with formula and breast milk get immense value from a cup rinser for sink use. Washing deep, narrow bottles with a handheld sponge brush is slow and messy.
A dedicated baby bottle cleaner stream scours the bottom corners in seconds. It does not replace a heated bottle washer and sterilizer for newborn hygiene. But it acts as an outstanding pre-wash tool before loading parts into the dishwasher. Parents find it works faster than manual bottle cleaners for clearing milk scum out of narrow bottle shoulders.
It also handles toddler straw cups and juice jars easily. Blasting bottles immediately stops formula residue from turning into foul-smelling crust.
Speed for Coffee Drinkers and Cocktail Enthusiasts
People who make French press coffee or protein shakes use this tool constantly. Coffee grounds cling to the bottom of glass carafes and clog your drain strainer.
A quick burst on a bar glass rinser flushes grounds and crema out cleanly. Home bartenders also love it for chilling glasses and cleaning shaker tins between rounds. You can rinse four cocktail glasses in twenty seconds without filling the sink with soapy water.
If your kitchen mostly sees flat plates and plain water glasses, think twice. A sink cup washer is built for deep cups and narrow bottles, not standard flat dinnerware.
What Separates Twenty Dollar Clones from Brand Name Hardware
Online marketplaces are flooded with thirty-dollar units that look identical in catalog photos. Once you hold them in your hand, the build quality tells a different story.
Spending a little extra money upfront protects your cabinets from hidden moisture damage.
Forged Brass Valves vs Plastic Internal Threads
Cheap models use plastic valve cartridges inside a thin stamped metal shell. The internal spring and valve stem handle constant downward force every time someone presses a cup down.
A detailed metal vs plastic glass rinser comparison shows that plastic threads fail quickly under pressure. Heavy downward force can crack a plastic valve core, sending high-pressure water spraying inside your dark cabinet. Premium options like the Delta glass rinser use heavy forged brass bodies and stainless steel trays. Brass components handle sixty pounds of household water pressure without dripping.
Removable Silicone Stars Prevent Hidden Mildew
The star-shaped pad that cushions your glassware collects grime underneath. Rinse water, milk splatters, and hard water minerals settle in the tiny gap below the actuator disc.
If that pad is hard to remove, grime collects fast. Pink bacteria and black mildew will grow in the damp crevices. Choose models with a lift-off silicone star that detaches without tools. Drop the nozzle head into a cup of white vinegar occasionally. This dissolves mineral scale and keeps the jets spraying straight.
Wiping the tray with a dry cloth at night stops mineral crust from etching into the finish. High-traffic homes benefit from brushed nickel or matte black finishes that hide hard water spots.
Installing the Hardware Without Flooding Your Kitchen
Putting a glass rinser for kitchen sink use into an existing hole takes forty-five minutes with basic hand tools. You do not need an expensive plumber if you take your time.
Working methodically under the sink prevents slow drips that ruin cabinet floors.
Mounting the Shank Through the Countertop
Start by clearing everything out from beneath your sink. Set a shallow pan under the shutoff valves to catch residual water. Got an old soap dispenser? Unscrew the large plastic wing nut underneath and pull the old dispenser out of the hole.
Clean the stone surface thoroughly with rubbing alcohol. Slide the rubber sealing washer over the threaded brass shank. Drop the rinser into the hole and point the drainage lip toward the sink bowl. From underneath, slide on the metal washer and tighten the brass mounting nut firmly with a basin wrench.
Make sure the tray does not twist while you tighten the nut from below. Having a helper hold the tray straight from above makes the job much easier.
Plumbing the Tee Valve and Testing Line Pressure
Shut off the hot water stop valve under the sink. Disconnect your flexible faucet supply hose, catching leftover water in your pan.
Screw the brass 3/8-inch compression tee onto the shutoff valve. Reconnect your main faucet hose to one branch of the tee. Attach the braided rinser supply hose to the second branch. Wrap every threaded connection with two layers of Teflon plumbers tape. Slowly open the shutoff valve and wipe every joint with a dry paper towel to spot leaks.
Press a cup down on the star actuator several times to purge air from the hose. Check underneath with a flashlight to verify that every connection stays completely dry under full line pressure.
Where This Tool Makes the Most Sense in Your Home
Adding high-pressure water accessories changes how you use your primary prep zone. A glass rinser is among the most practical modern kitchen sink accessories you can add to a home.
Planning surrounding finishes keeps your kitchen feeling unified and visually balanced.
Wet Bars and Dedicated Coffee Stations
Most homeowners drop these sprayers into their main kitchen sink with glass rinser setups. However, putting one into a secondary wet bar or coffee station works even better.
Secondary sinks handle endless wine glasses, cocktail strainers, and espresso shot glasses throughout an evening. Adding a dedicated sink with glass rinser in a butler pantry is smart. It keeps dirty glassware out of your cooking zone. If you are building an entertaining zone, browse our bar cabinet ideas to plan plumbing and storage together. You can also explore our kitchen remodeling guide for layout ideas that streamline daily food prep.
If you want to match classic plumbing finishes across adjacent rooms, check our pedestal sink guide for design inspiration. If you share your home with animals, read our pet care guide for tips on keeping pet bowls clean and sanitary.
Common Problems and Quick Fixes
Here are quick answers to the practical issues homeowners run into after installing a countertop sprayer.
Can a glass rinser shatter thin wine glasses?
No, as long as you push down gently on the base. The water pressure pushes outward against the glass walls without causing mechanical cracking or thermal shock.
What size hole does the mounting shank require?
Standard models fit a 1.25 to 1.5-inch hole. This matches the standard knockout size used for kitchen soap dispensers and side sprayers.
Does a glass rinser replace a standard dishwasher?
No. It is a rapid pre-wash tool designed to blast out wet residue, milk scum, and coffee grounds. It does not use soap or sanitizing heat.
Can you adjust the water pressure on the spray jets?
Yes. You can fine-tune the spray force by slightly opening or closing the dedicated shutoff valve beneath your cabinet.
Will hard water clog the spray nozzles over time?
Yes, calcium deposits will eventually restrict the small water ports. Unscrew the spray head once a year and soak it in white vinegar for thirty minutes to clear the jets.
[…] bottle brushes splash soapy water onto your backsplash and clothes. Some parents install a sink glass rinser for quick cup flushes. Yet manual basin rinsing still leaves oily breast milk residues behind. […]